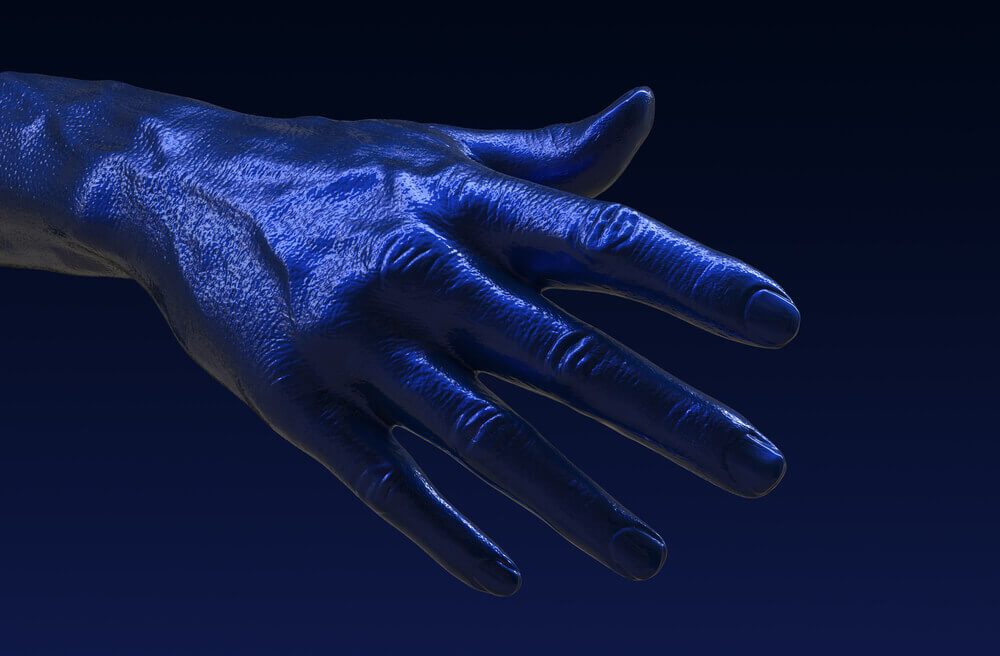
Realistic hand: tendons, veins, fat, and more
We explore how to create realistic hands by adding anatomically accurate details to the hand that you’ve sculpted or drawn.
Knowledge of basic hand anatomy helps artists immensely. We’ve all heard a lot about artists struggling with sculpting and drawing hands, but clear knowledge of the skeleton of the hand eliminates most of these hardships.
In this blog, we’ll look at the bones and muscles of the hand and explain how they determine the proportions and basic shapes of the hand. In the end, we’ll give you tips on how to sculpt and draw hands with the basic shapes in mind.
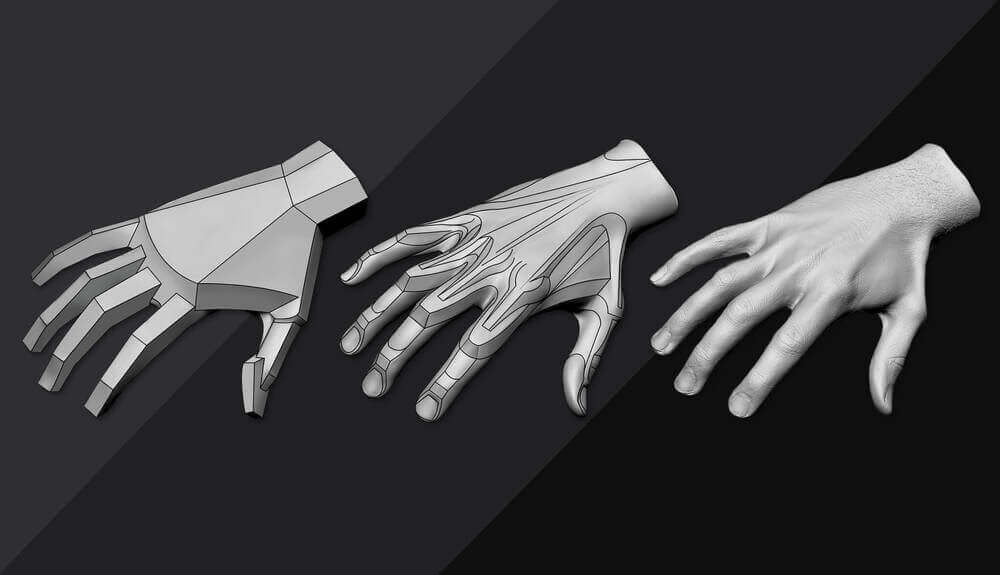
This blog explores anatomy relevant to creating the basic shapes of the hand, but we’ve also written a blog on finer hand details, which explores veins, tendons, fat pads, and skin folds of the hand, as well as hand aging and more.
It will even allow you to give your hand a nice finish with some correctly constructed fingernails! Check out the blog on smaller hand details here!
Want to learn more about dynamic movements of the arm? Our newest book is coming soon – Arm and Hand in Motion.
The most common and fundamental mistake when drawing or sculpting hands is not considering the hand’s bone structure. But the hand is approximately 90% bones. Bones determine the hand’s proportions, form, and range of motion. If you get the bone structure right, you’ve done half the job to be on the right track.
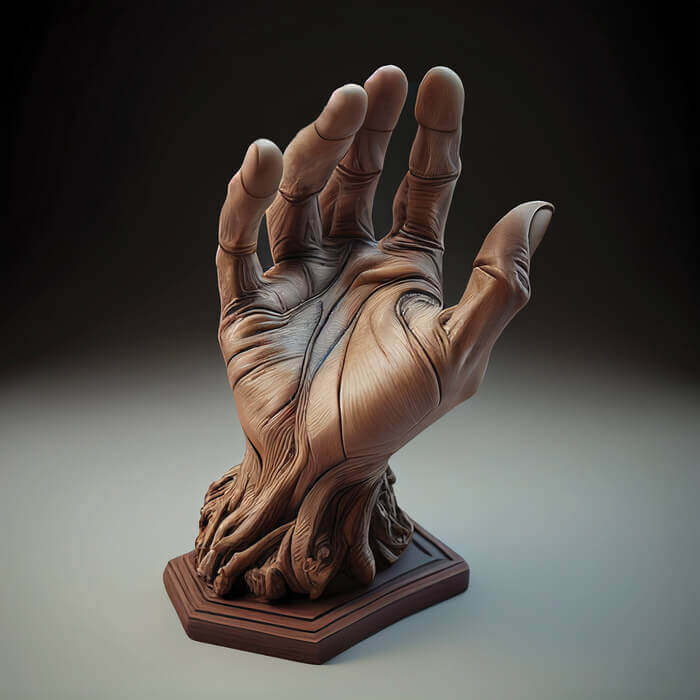
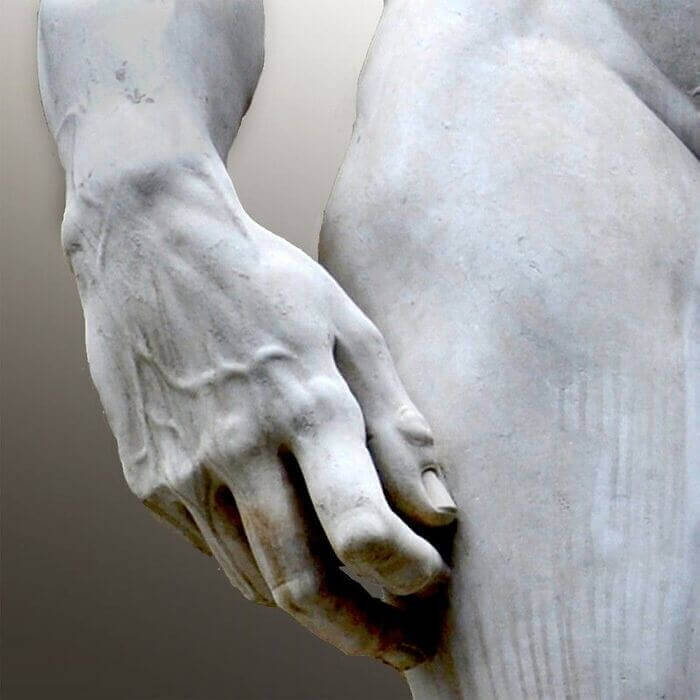
Anatomically incorrect AI-generated hand vs. the hand of Michelangelo’s David
There are zero muscles in the fingers, while the palm has some. The palm muscles are divided into three groups. Knowing the skeleton and the three muscle groups in the palm gives you all you need to construct the hand’s basic shapes correctly.
Next, you can develop the detailing of the hand according to the placement of tendons, veins, fat pads, skinfolds, creases, etc.
There are three types of bones in the hand and wrist: carpal, metacarpal, and phalanges.
A cluster of eight small carpal bones form the wrist. Metacarpal bones (sometimes called the invisible phalanges) are hidden underneath the skin in our palms. Phalanges are the bones that make up the fingers of the hand.
All fingers except the thumb have three phalanges connected by hinge joints.The thumb has only two phalanges.
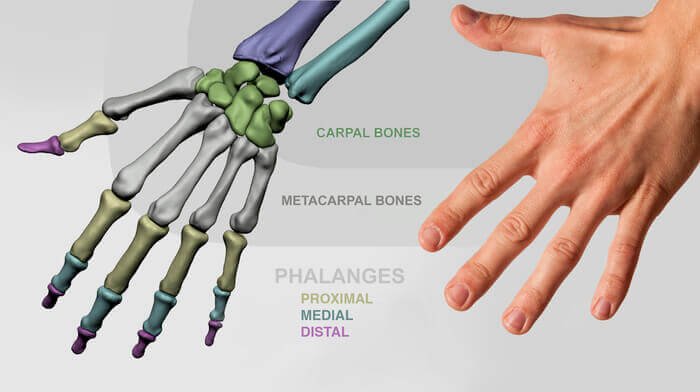
The three types of bones in the hand are carpal, metacarpal, and phalanges.
The hand proportions relative to the rest of the body are as follows:
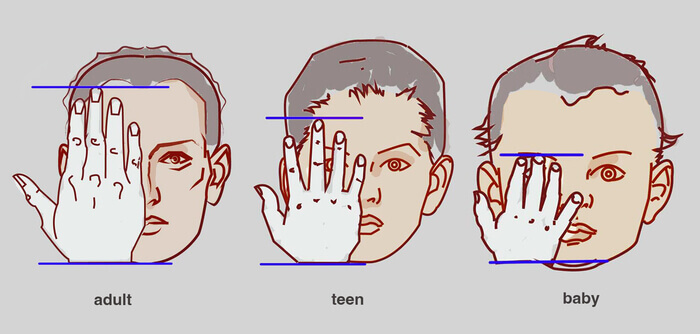
Hand proportions relative to the head for different ages.
You can make hands a bit bigger for males.
Regarding the parts of the hand, it’s important to note that the length of the middle finger is half the hand’s total length.
The size of the proximal, medial, and distal phalanges can be calculated using one of the two methods shown in the picture below. The fingernail is half the length of the distal phalange.
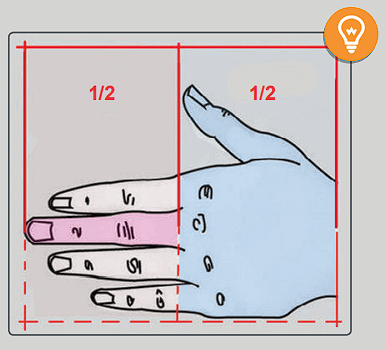
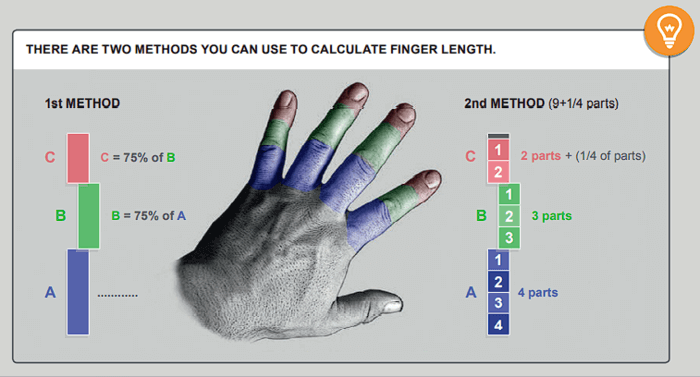
There are two methods you can use to calculate finger proportions.
It’s essential to recognize that the form of the hand is not flat but arched. The arch of the hand starts with the carpal bones and continues with the knucklebones and the proximal phalanges.
The cluster of carpal bones form an arch at the palmar side of the wrist. The space beneath this arch is known as the carpal tunnel. You’ve probably heard about it. Several tendons and nerves pass through the carpal tunnel. If these nerves become pressed or squeezed, you experience carpal tunnel syndrome.
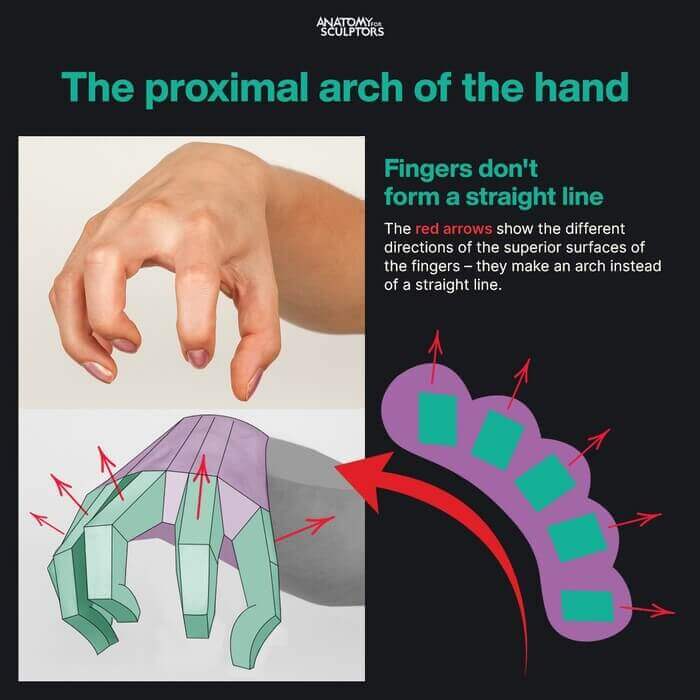
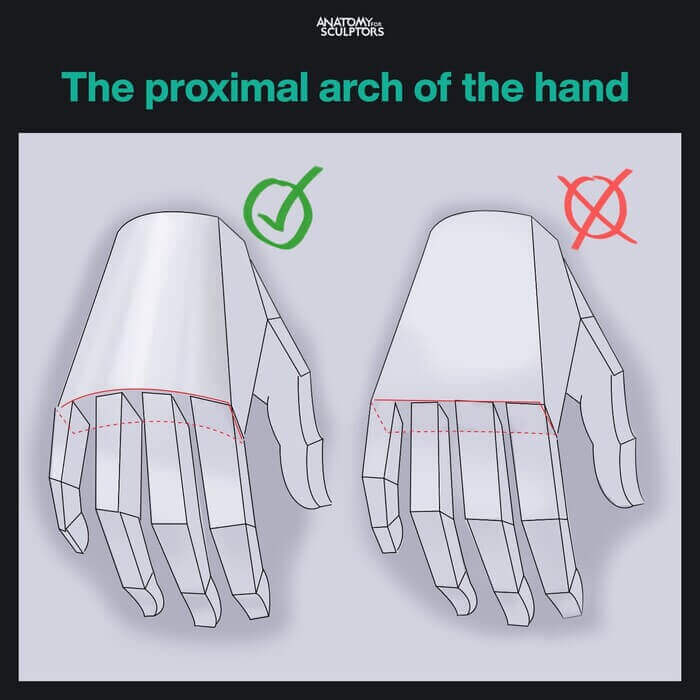
The hand is arched and each proximal phalanx faces in a slightly different direction.
More pictures like this on Anatomy for Sculptors ArtStation.
The proximal arch of the hand continues with the metacarpal bones. This is why the knuckles never align. Likewise, the superior surface of the proximal phalanges do not form a flat surface. Each of the proximal phalanges faces in a slightly different direction.
Finally, it’s also important to note that the fingers differ in length and are not completely straight. The side fingers tend to curve towards the middle finger subtly.
There are some places where the skeleton and the surface form of the hand don’t precisely match. One such place is the metacarpophalangeal joint.
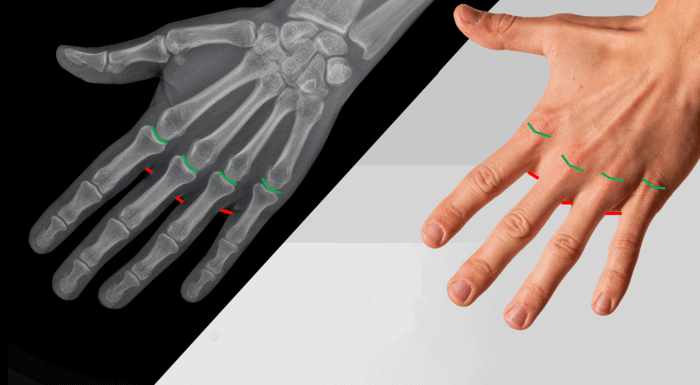
The fingers start (red) slightly after the metacarpophalangeal joint (green).
You could assume this joint is the beginning of fingers.Yet, on the surface forms, the separation of fingers happens slightly lower. The metacarpophalangeal joint is visible as the knuckles. Then, beyond the knuckles, there’s the webbing between the fingers.
So don’t draw or sculpt V-shaped spaces between the fingers. Recognize that the webbing makes the transition between the fingers smoother.
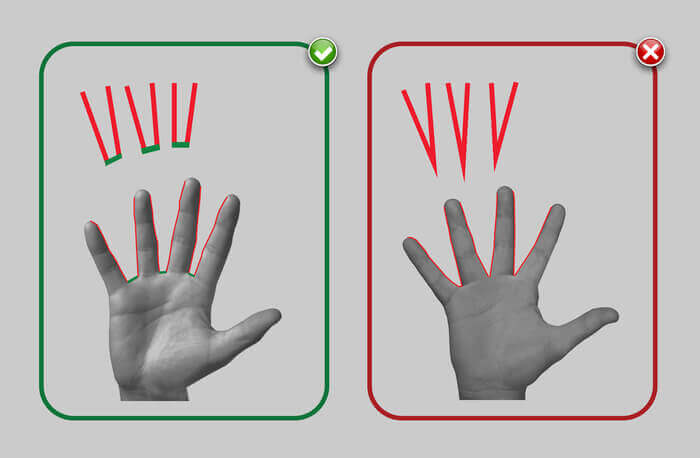
Spaces between fingers are not V-shaped, there’s webbing between them.
The next essential thing to note about the fingers is that they’re longer at the back of the hand and shorter at the palm side.
At the wrist, the cluster of eight carpal bones articulates only with the radius; it doesn’t connect with the ulna.
Because of the gap between the carpal bones and the ulna, the hand can move up to 40 degrees outward (called ulnar deviation). On the opposite side, where the hand articulates with the radius, the hand can move only 1-3 degrees.
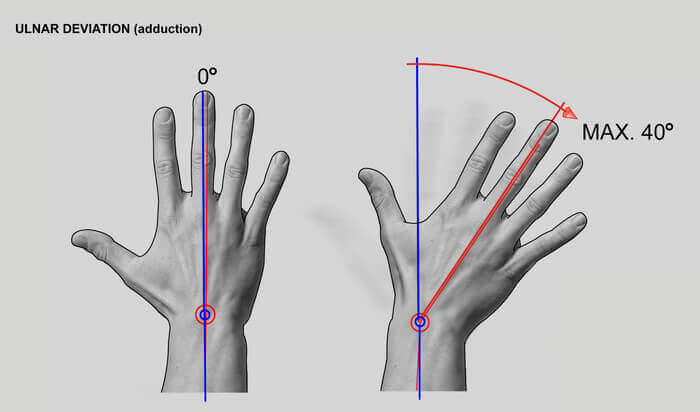
Hand’s range of motion at the wrist – ulnar deviation can reach up to 40 degrees.
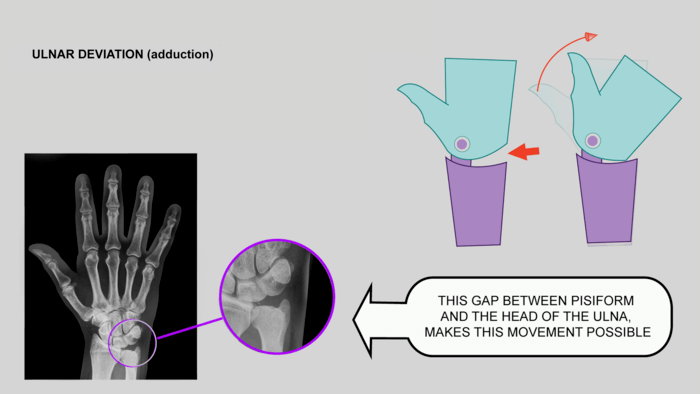
Ulnar deviation is possible because of the gap between the carpal bones and the ulna.
The carpal bone cluster also makes the wrist quite flexible for flexion and extension. The wrist can be flexed up to 50 degrees and extended by 45 degrees.
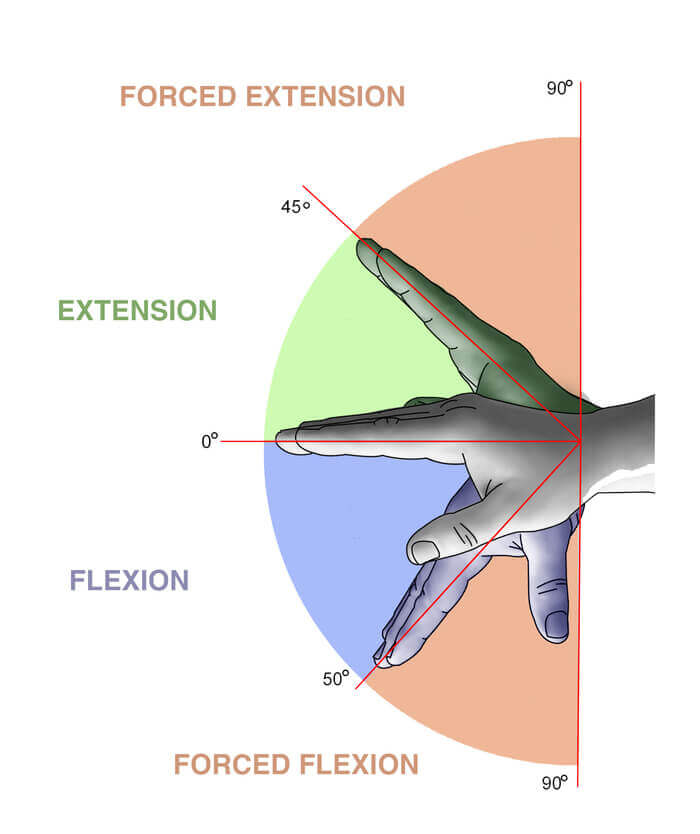
The range of wrist flexion and extension.
When the wrist is bent, the carpal bones increase its surface by 15%.
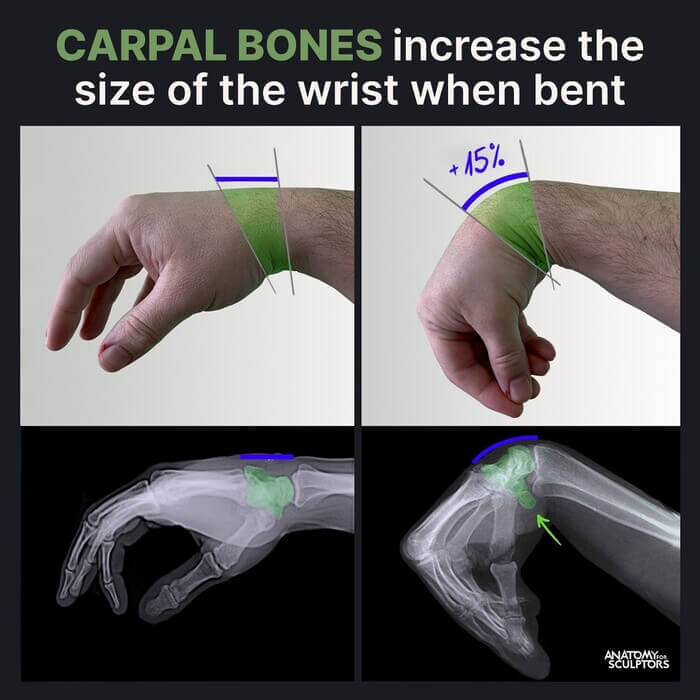
The range of wrist flexion and extension.
The muscles of the hand are divided into two groups: intrinsic and extrinsic.
Fingers are made of bones, tendons, and fat, and they don’t feature any muscles at all. The extrinsic hand muscles are the ones that primarily move the hand. However, the extrinsic muscles are all located in the wrist, which means that they don’t really affect the form of the hand.
The hand features 20 intrinsic muscles. From these, we can single out three muscle masses or eminences that are visible on the surface and influence the shape of the hand.
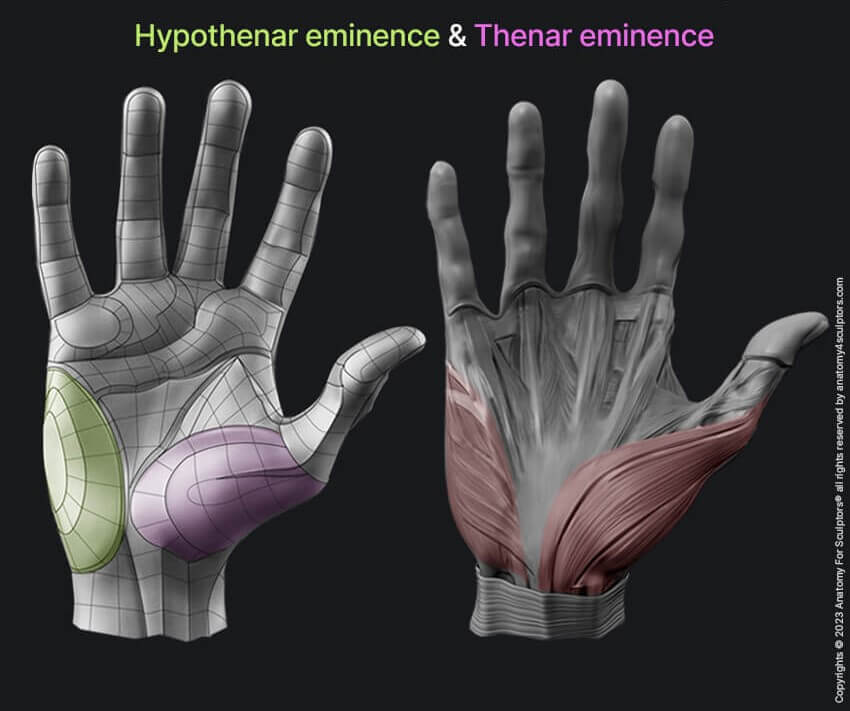

Two muscle masses or eminences of the hand are located around the thumb, and the third is beside the pinky finger.
Two masses are located around the thumb, and one is beside the pinky finger. They all form a kind of teardrop shape with the wider end towards the wrist and the narrower end towards the fingers.
The hand’s biggest and most significant muscle mass is the thenar eminence located on the palm side right above the thumb. It starts at the wrist and attaches to the thumb bones. As the thumb moves, the form of this muscle mass changes a lot.
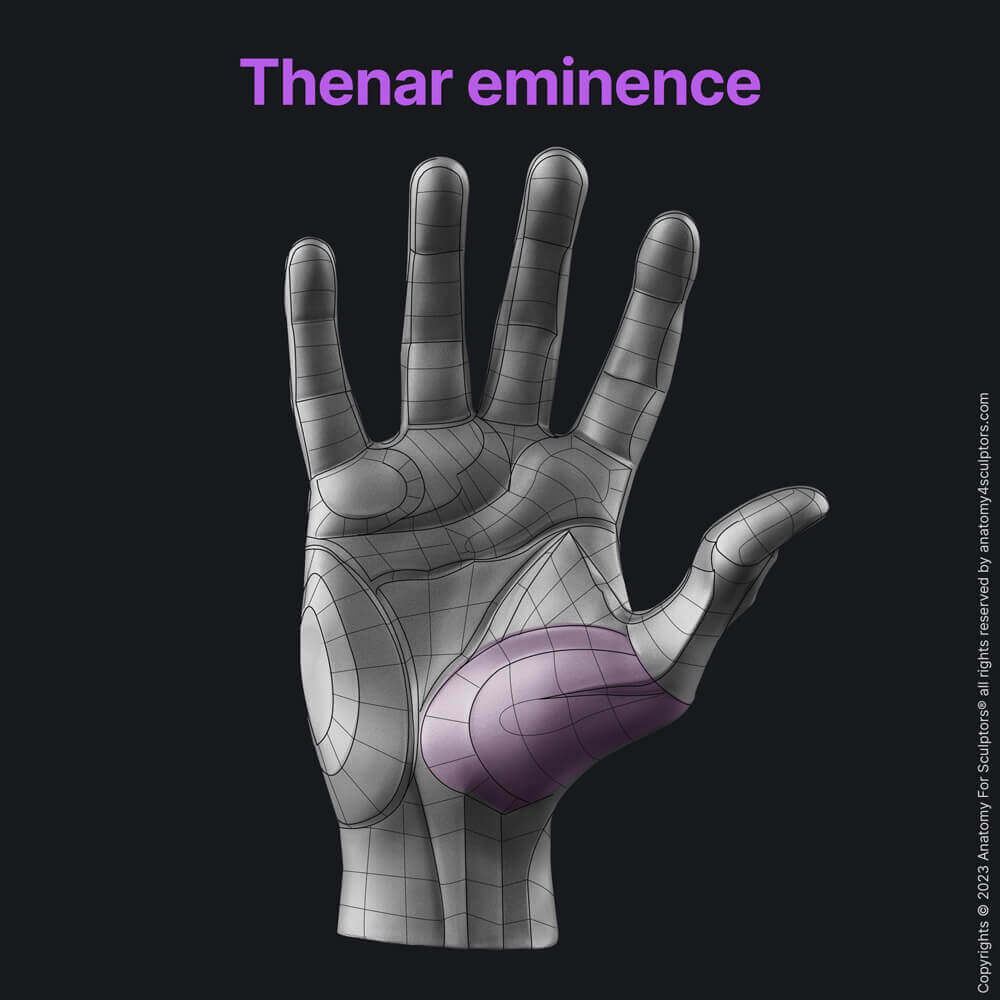
The thenar eminence is right above the thumb on the palmar side.
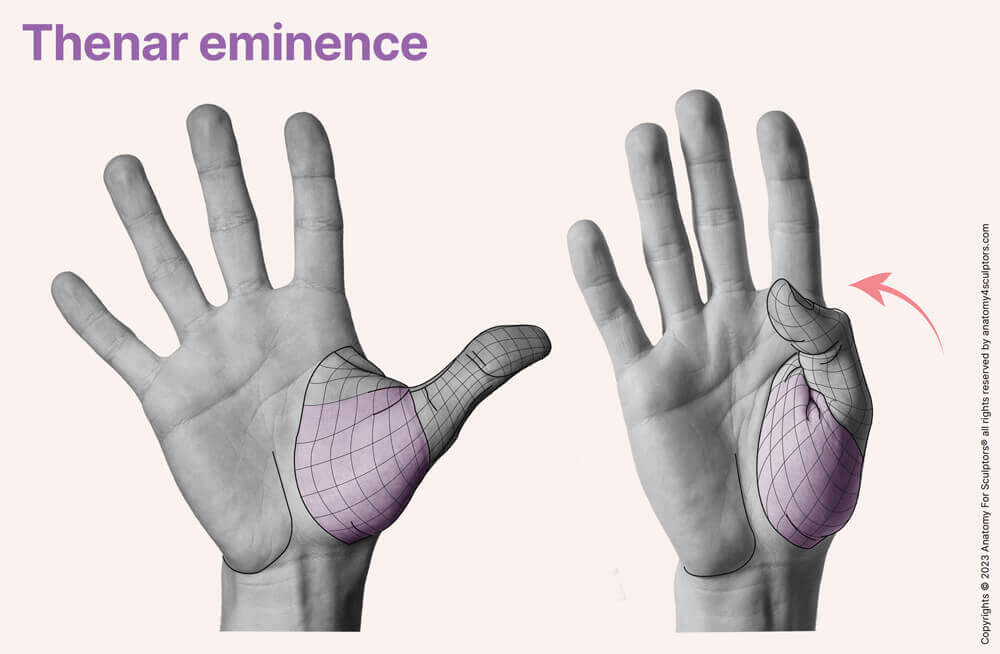
The form of the thenar eminence changes a lot as the thumb moves.
On the other side of the palm, around the pinky finger, there’s the hypothenar eminence. It might look like the thenar and hypothenar eminences meet in the middle of the palm, but in reality a gap filled by tendons and fat separate these two muscle masses.
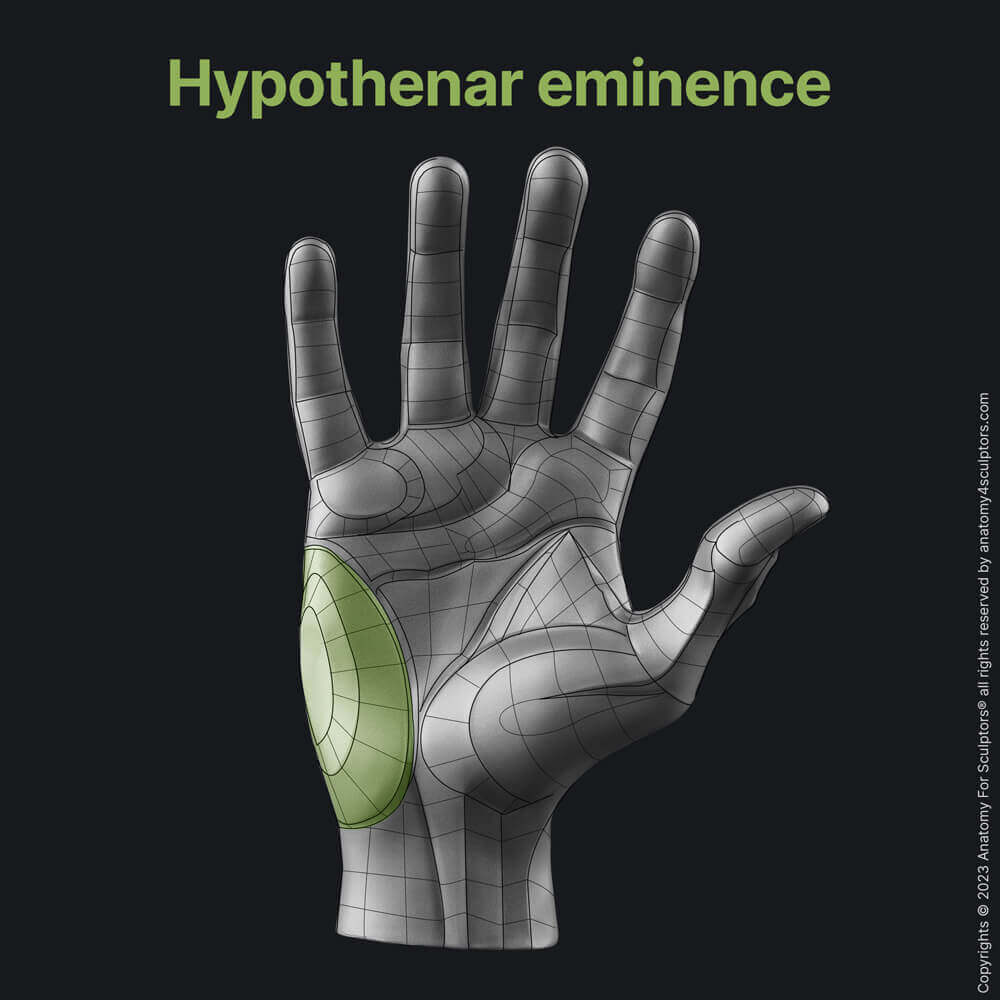
The hypothenar eminence is right above the pinky finger on the palmar side.
The hypothenar eminence is smaller than the thenar eminence. It stretches from the wrist toward the outside of the pinky metacarpal. The hypothenar eminence travels along the outside edge, which is why this side of the hand looks rounder than the other.
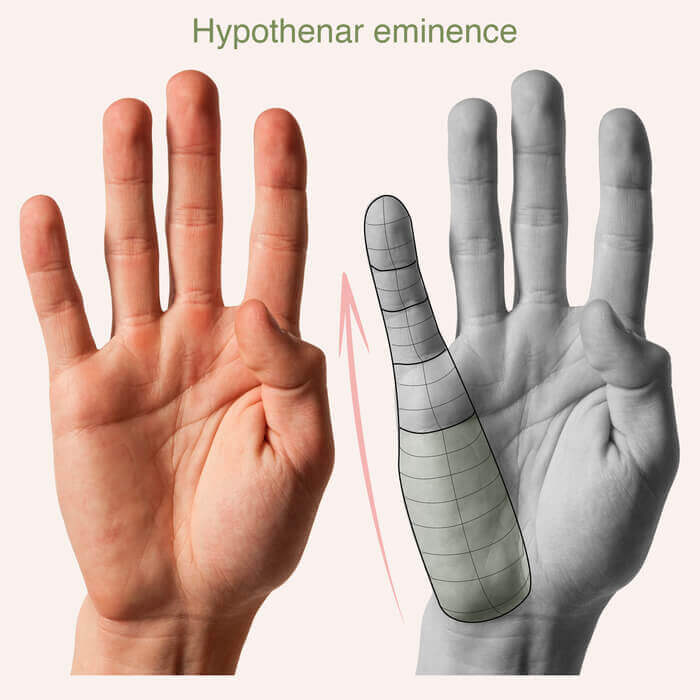
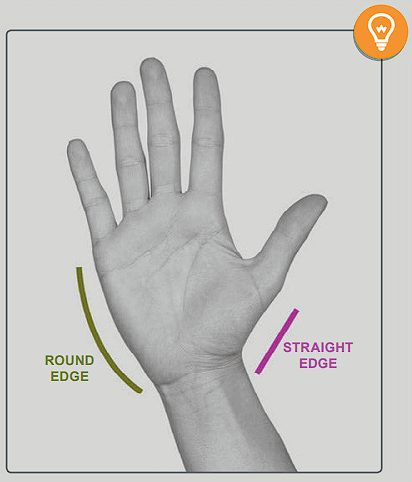
The hypothenar eminence travels along the outer edge of the pinky finger metacarpal bone, making this side of the palm rounder than the other.
The third muscle mass is located on the back side of the hand. It’s called the first dorsal interosseous, and it’s located between the thumb and the index finger metacarpals, creating a little egg-shaped bulge.
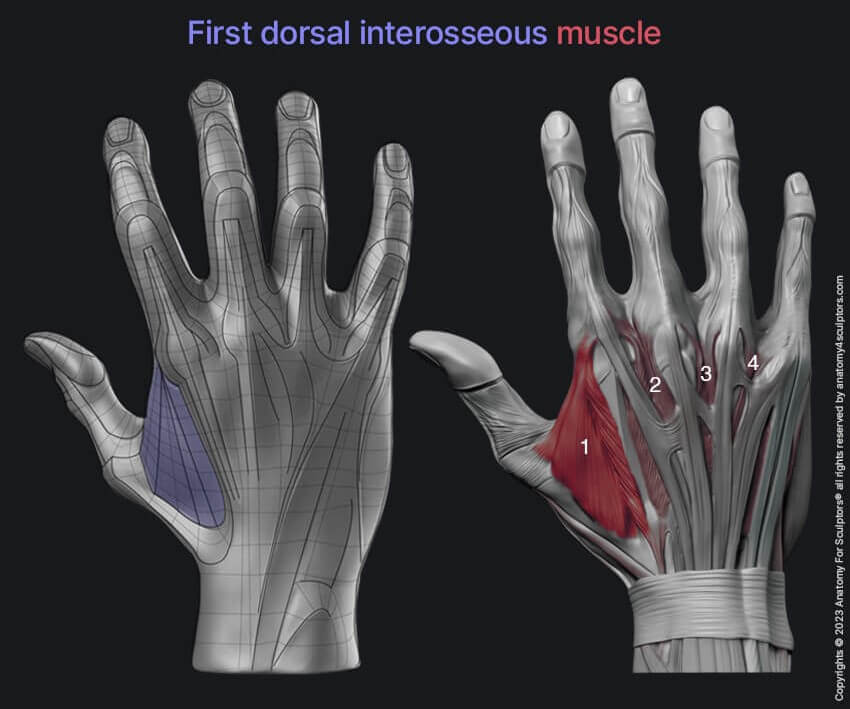
The first dorsal interosseous muscle is located between the thumb and index finger metacarpals on the back side of the hand.
Since the muscle is located between the bones, the surfaces of the metacarpals remain straight, hard, and bony. Yet, there’s a squishy bit between them filled by the first dorsal interosseous.
When the thumb is stretched out, the first dorsal interosseous is barely visible. But when the thumb is squeezed in, this muscle mass pops out, creating the little bulge.
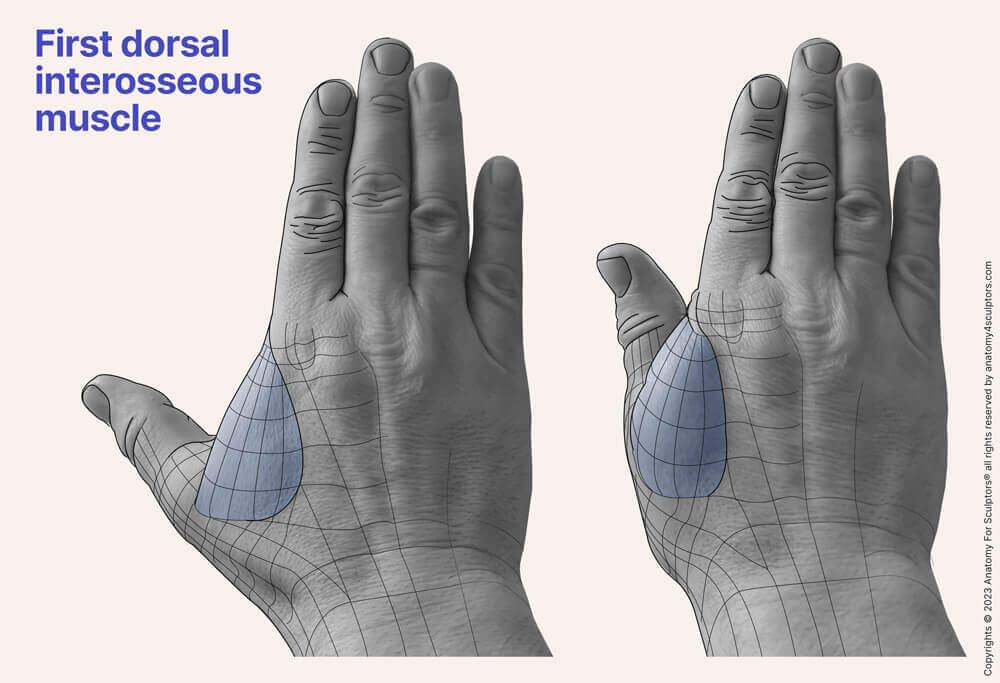
When the thumb is stretched out, the first dorsal interosseous muscle is barely visible, but when the thumb is squeezed in, it pops out creating a characteristic egg-shaped bulge.
Now that you know the basic anatomy of the hand, you can start drawing and sculpting hands using simple shapes. This approach lets you understand the structure of the hand and it will be more accurate than just trying to copy what you see from reference images.
After you’ve gotten the primary structures right, you’re free to develop secondary forms and do some detailing. Just remember that adding the detailed shapes mustn’t make the primary forms disappear.
Thinking about the gesture before starting work with concrete structures is a good idea. Generally, it’s good to strive to make the hand gesture feel relaxed, not too robust and tense.
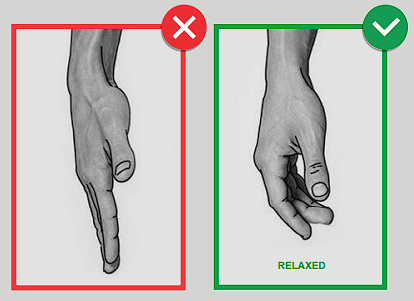
We rarely keep our fingers straight, slightly bent fingers feel and look more natural.
It’s good to study some hand poses from references. One of the poses you can choose is making the middle finger and the ring finger look like they’re best friends. Hand is more natural-looking this way. There are countless artwork examples where the middle and ring fingers stick together, and it just works!
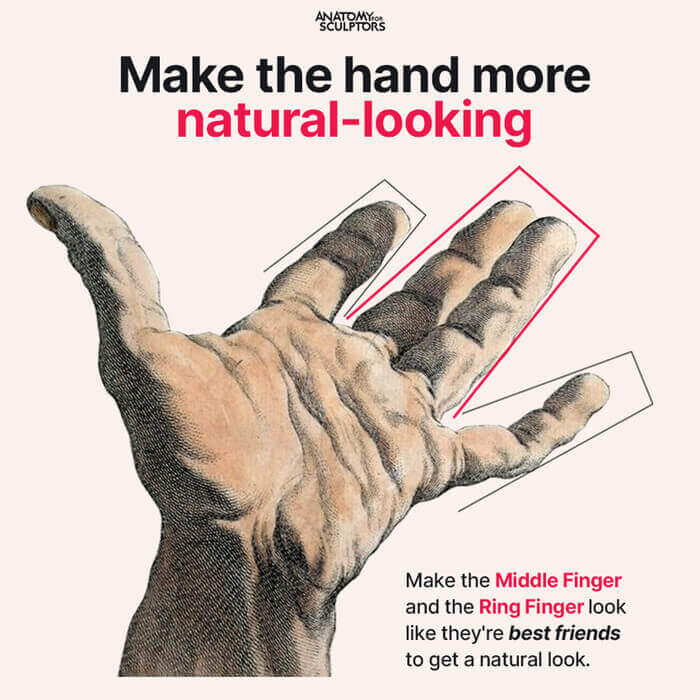
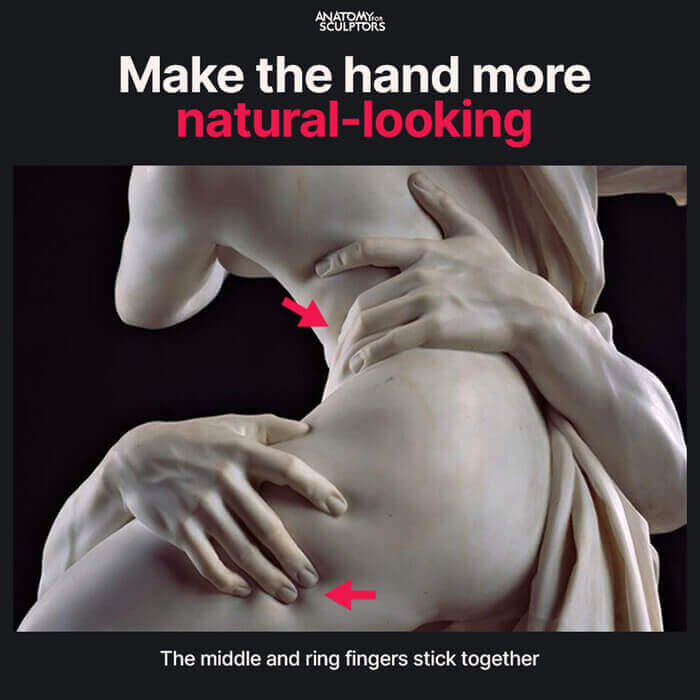
Make the middle finger and the ring finger look like they’re best friends.
The basic shapes of the hand come first, and only after you’ve gotten them right can you move on to refine them to create a more realistic and detailed hand. It’s essential to have the correct proportions and relationships between these basic shapes to make a hand that looks natural and accurate.
For this, we rely on the skeleton knowledge that we’ve already gained. We begin with getting the overall proportions of the hand right and then continue by creating the palm. The palm is a roughly rectangular shape, but we have to keep in mind the arch that it makes. This arch is also visible and continues in the curve of the knuckles.
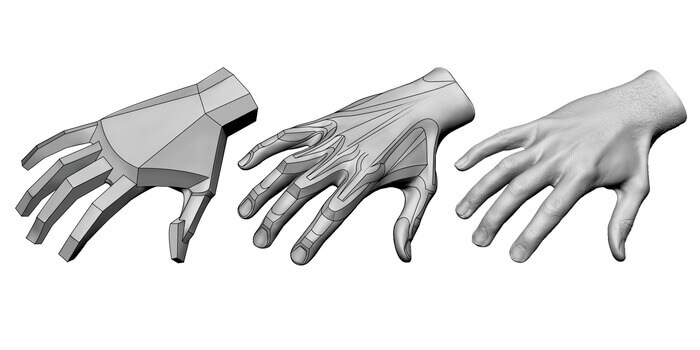
Forming of the hand: from basic shapes to complex forms.
The fingers are long, narrow shapes that extend from the palm, and they also have a curve, with the middle finger being the longest, the index finger being a bit shorter, and so on. The thumb is a shorter, wider shape that extends from the side of the palm, and it faces a different direction from the rest of the fingers.
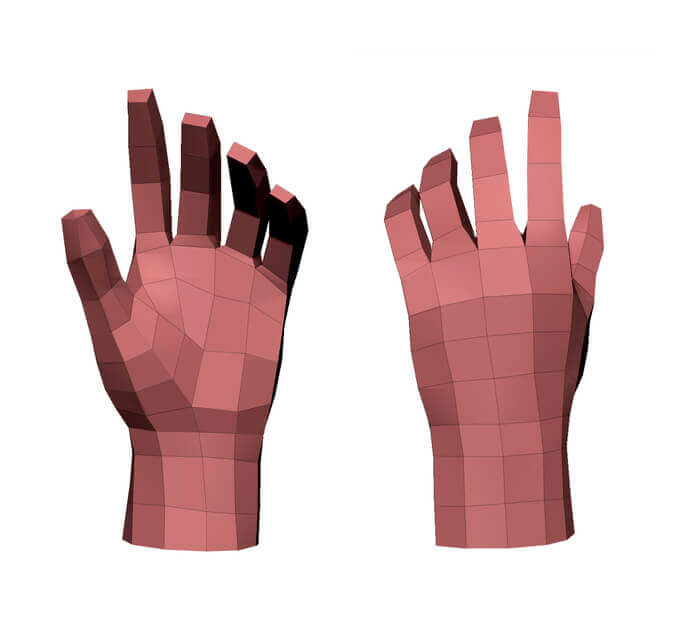
Hand mesh.
Remember that It is much easier to model fingers starting from simple square forms rather than cylindrical ones. Although we often think of fingers as cylindrical, that is not the case.
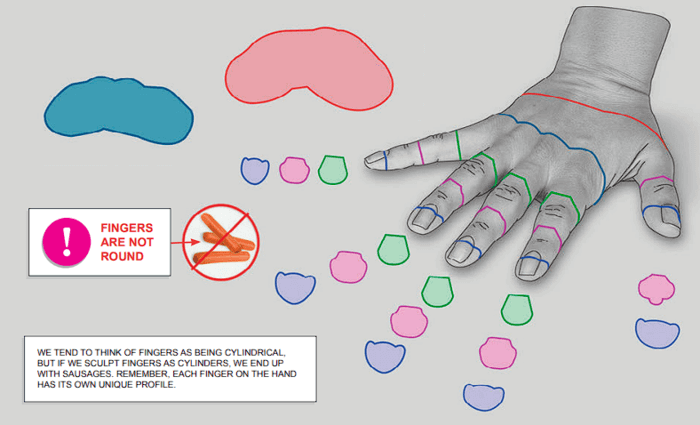
Cross-sections of the fingers reveal that fingers are not sausages.
If we use cylinders for modeling fingers, it’s very easy to end up with sausage fingers. In reality, fingers are diverse: they look different on the palmar side compared to the hand’s back side. The picture also shows how a proximal phalanx cross-section differs from cross-sections of medial and distal phalanges. None of them are a round circle, as a cross-section of a sausage would be!
After you’ve made a nice base of the hand using the basic shapes, your next step is to refine it to create a more realistic and detailed hand. See our blog on refining the hand for further reading!
Be the first to get news about our upcoming discounts, books, tools, articles and more! No spam, just the good stuff.

We explore how to create realistic hands by adding anatomically accurate details to the hand that you’ve sculpted or drawn.
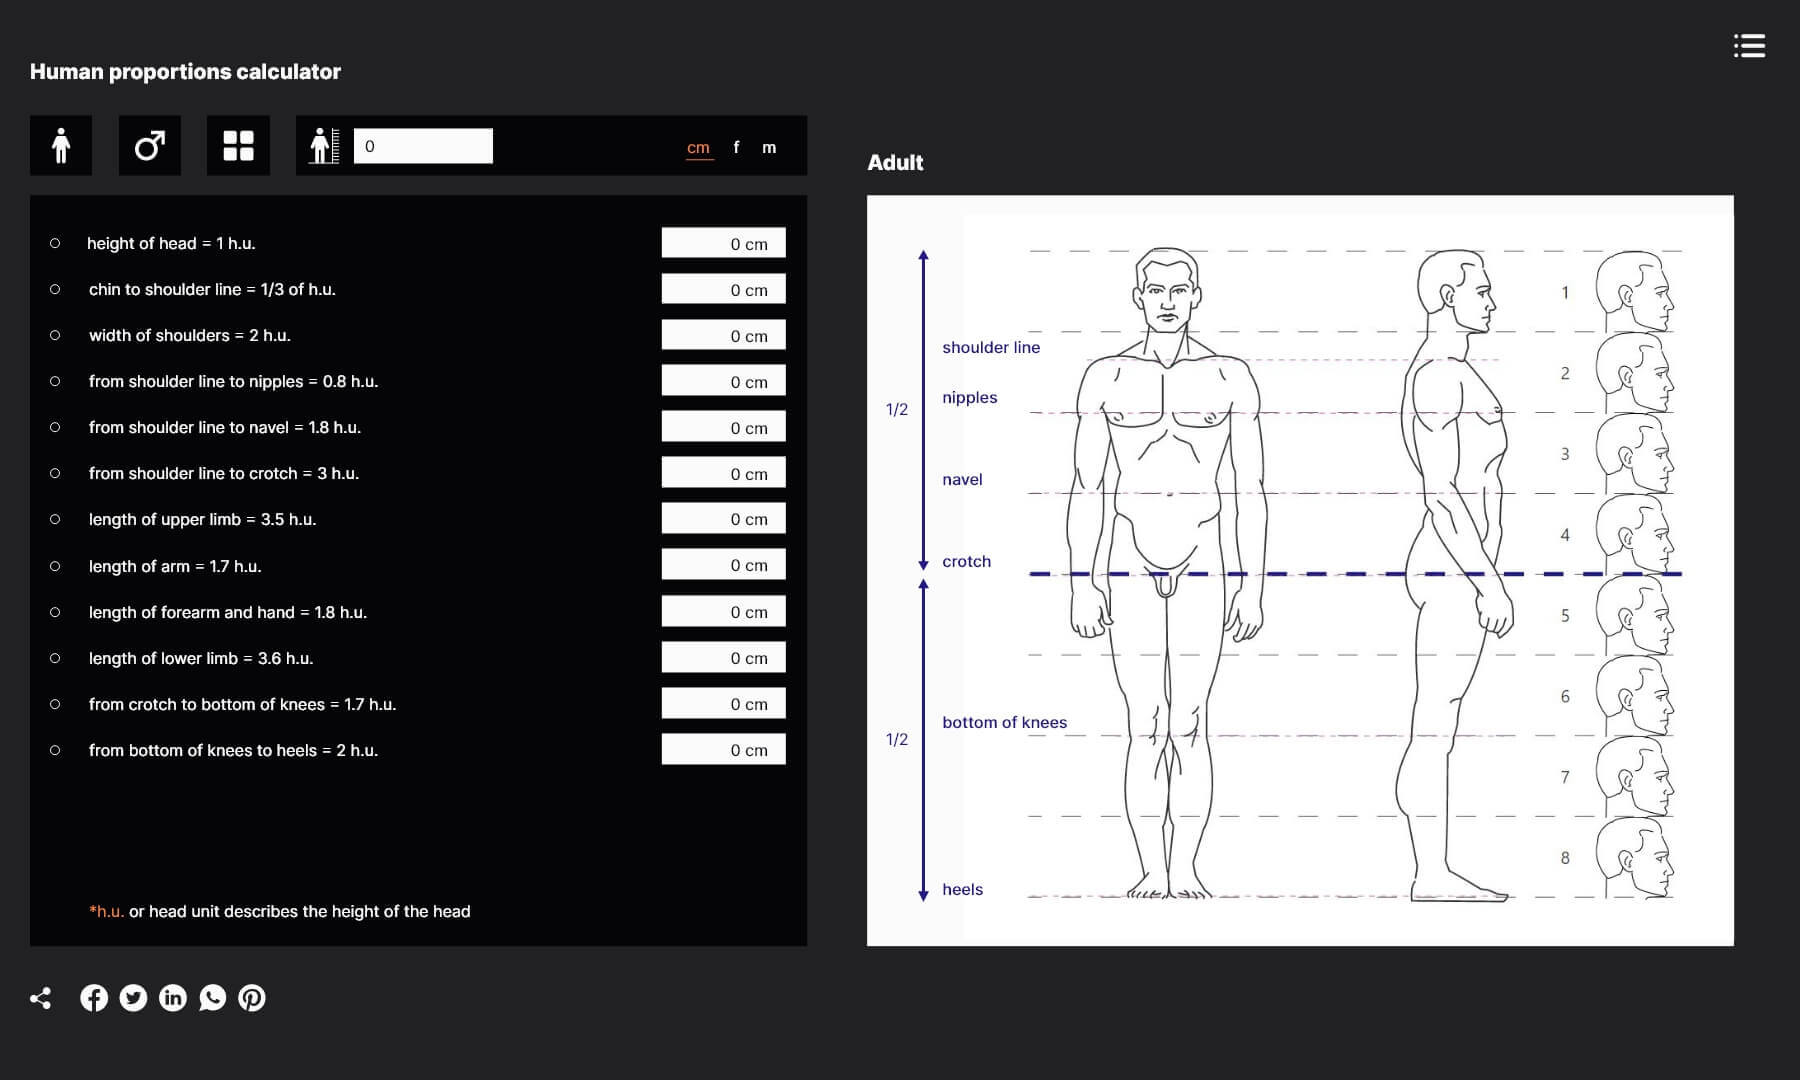
This tool provides a simple and fast way to know the proportions of an ideal and realistic human figure. It proposes an easy way for an artist to understand what the human body proportion sizes are.