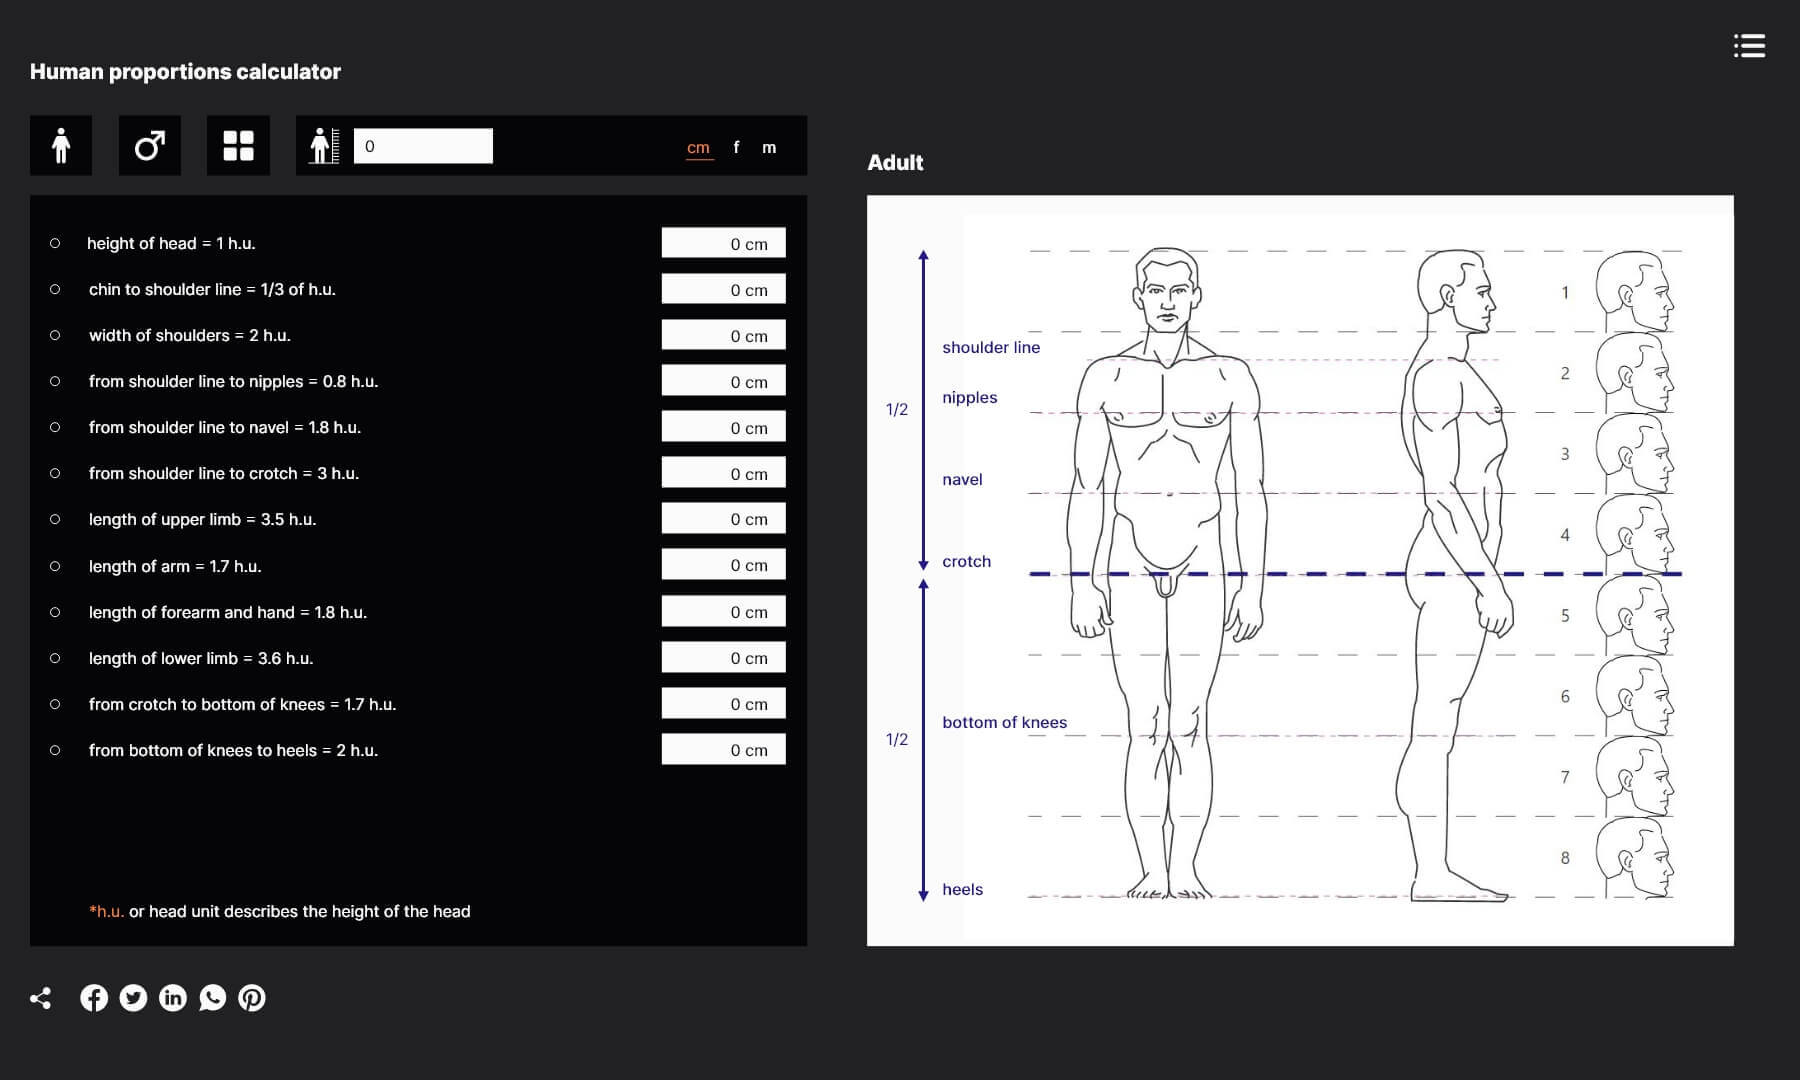
About human proportions calculator
This tool provides a simple and fast way to know the proportions of an ideal and realistic human figure. It proposes an easy way for an artist to understand what the human body proportion sizes are.
This article will be useful for artists on both sides of the spectrum: those who have a good understanding of anatomy but don’t know how to use it in their sculpting and drawing, as well as those who have mastered figure drawing but do that without any real understanding of anatomy – and therefore risk creating a human form that is physically impossible.
We’ll look at the most common errors artists make when they apply incomplete anatomical knowledge to their artwork. We will also provide some solutions for these challenges and share a few general tips on how to make the most of your sculpting, drawing, or modeling practice.
Regardless of whether you’re a sculptor, a painter, an animator, or sculpting 3D models digitally, there is a set of human anatomy principles that are relevant for every kind of visual artist.
The skeleton is the part of the human anatomy many young artists tend to ignore. Why learn about the bones if you just want to sculpt or draw the muscles, right? However, if you only copy nature or images without any real understanding of the anatomy and anatomical landmarks of the body, you are bound to misinterpret a lot of things.
In addition to that, if you concentrate too much on the muscles when copying your reference material, you might miss a thing or two that are actually really important for your artwork to look real. Skeleton is the very foundation of the human body and it provides us with crucial information that allows us to depict the human form successfully.
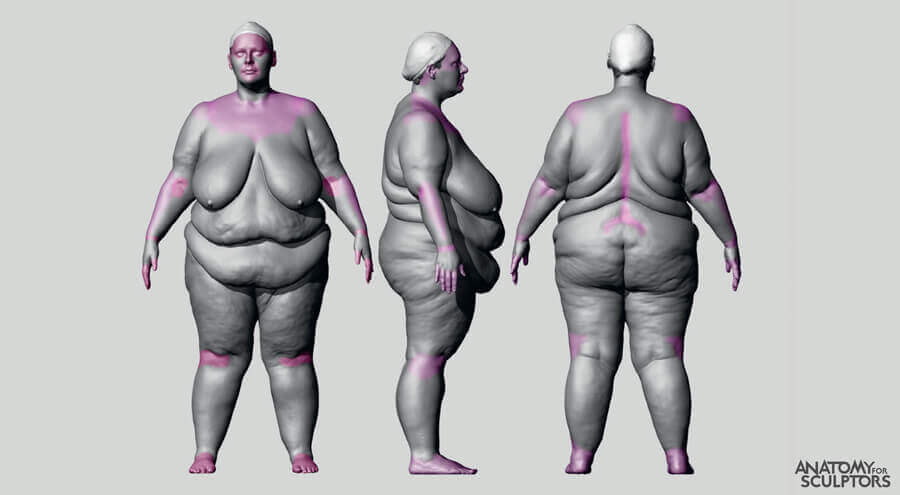
Areas of the body least affected by fat accumulation.
(from “Anatomy for Sculptors: Understanding the Human Figure”, p.62)
Body muscle and fat can vary dramatically from person to person, but a bodybuilder and a couch potato can have almost identical skeletons. That is why the skeleton is a very reliable reference point and can help with understanding body proportions.
Take the human head, for example. The height of an average male will be about 7.5 times the height of that man’s head, and the rib cage of any person will always be as deep as their head is tall regardless of how much muscle and fat it will have.
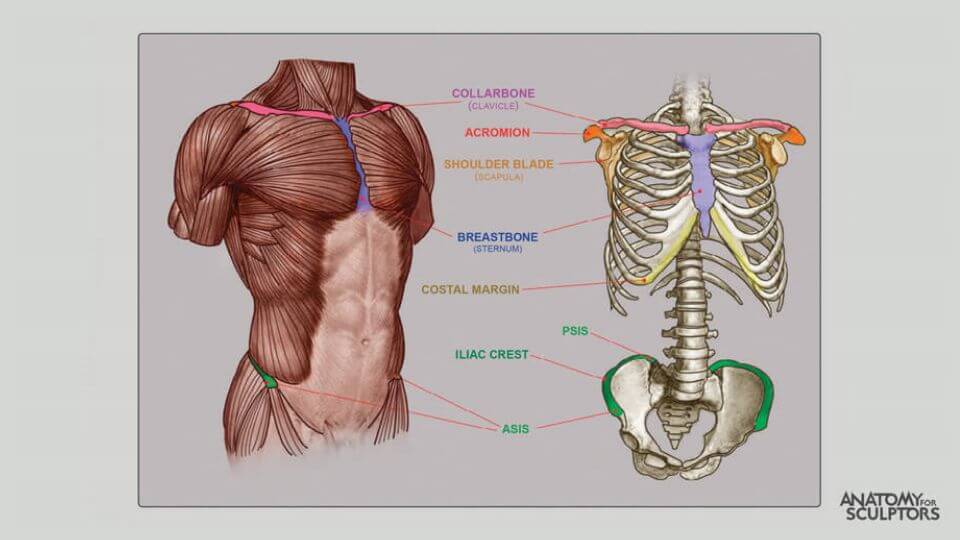
The human body is also dotted with clearly visible bony landmarks like the back of the spine, collarbones, and elbows. These are helpful points from which to measure body proportions. They work much better than the fleshy landmarks like the navel, nipples, or the bottom of the buttocks. The skin is stretchy and can sag, so the person’s age and body type will impact their position.
If you strive to master human body proportions, be sure to check out our human body proportions calculator that we created as one of the goals of our Kickstarter campaign. It’s available right now! And it’s free to use!
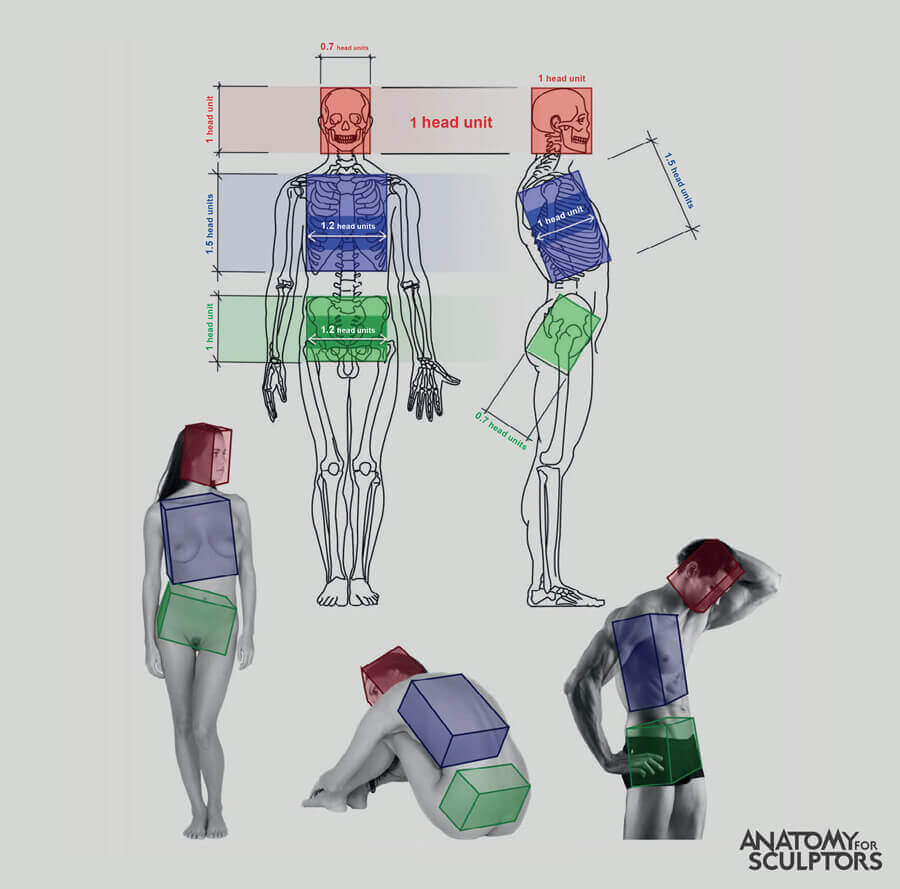
Human body proportions in head units.
(from “Anatomy for Sculptors: Understanding the Human Figure”, p.19)
Remember those muscles you were so eager to sculpt and draw? Each of them actually has its origin and insertion points where they attach themselves to the skeleton. The origin is the point where the muscle attaches itself to the more central and stationary part of the body, and the insertion is the point where it binds to the more outer and movable part of the body.
A great exercise for practicing muscle placement is called anatomy tracing. You can start by tracing muscles on a reference photo and then when you’ve got the hang of it – turn it up a notch and try placing the forms of the muscles on top of a model of a human skeleton.
The knowledge of the skeleton and the bony landmarks make it easier for you to track the locations of muscles and understand their form. This makes it a lot easier to sculpt, draw, or model a realistic-looking bicep or a quad.
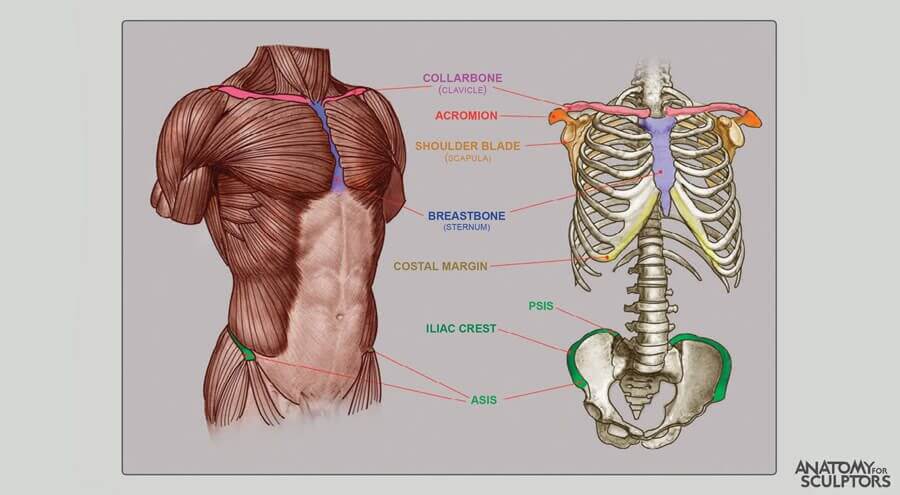
Bony landmarks on a male torso.
(from “Anatomy for Sculptors: Understanding the Human Figure”, p.11)
Understanding the human skeleton also means understanding the variety of joint types and their motion. That will help you figure out how to create convincing poses and how the motion transforms the surface forms. You will also learn the limits of the movement for each body part.
It was a rather complex task to render the correct anatomy and at the same time not to be too naturalistic and lose the aesthetic dimension.
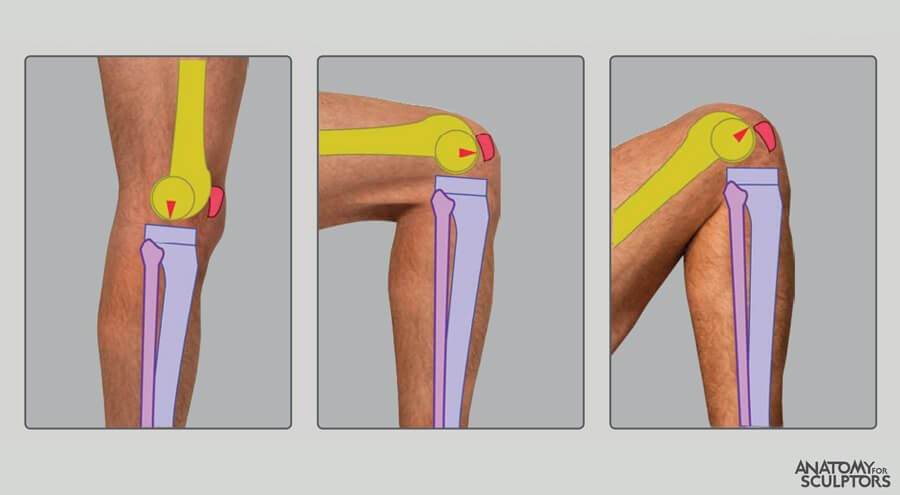
Knee joint mechanics.
(from “Anatomy for Sculptors: Understanding the Human Figure”, p.206)
We won’t go into details about body movement in this article. But it is good to know that there are 6 types of synovial joints found in the human body: hinge, pivot, ball & socket, ellipsoid, saddle, and plane.
There are also cartilaginous joints that are not that important for artists since they don’t move. (However, there is one exception – the spine.) Each joint type is able to perform a specific set of movements, and understanding them will help you depict body motion realistically.
When sculpting or drawing a human figure, it’s not enough to just know and understand the human anatomy, it is equally important to know how to shape the surface forms of the muscles. To make this easier, artists break down the elements of the human body by using basic shapes. We have explored in detail how to create the 3D shapes of muscles in this article.
Finally, let’s look at some general advice on how to study anatomy for art and how to maximize the results of your studies and exercises.
First of all – get ready to be very patient, create a lot and also fail a lot.
You might already have seen countless anatomy references for art. But it is not enough to just study anatomy. If that were the case, every doctor would be an amazing artist. Yet, they are mostly famous for their undecipherable handwriting.
Instead of just reading and listening about anatomy, you should sculpt, draw, sketch, model, and create as much as you can. That is the first condition for actually learning anatomy for visual artists.
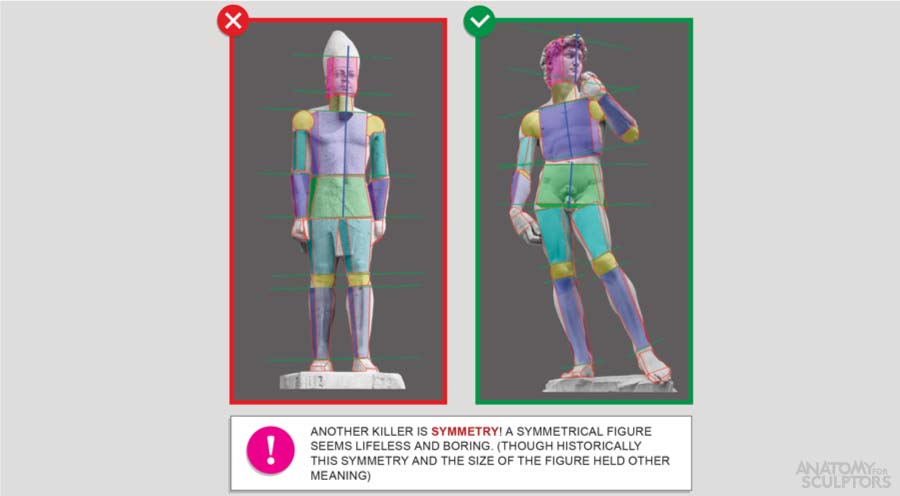
The improvement after you follow the advice of your study buddies.
(from “Anatomy for Sculptors: Understanding the Human Figure”, p.15)
We already mentioned anatomy tracing as a great exercise to start learning human anatomy. But whether you’re sculpting, drawing, or 3D modeling, the key to success is introducing variety in your exercises. Try creating while taking references from real life, other artworks, photos, sculptures, and your own imagination.
Training your brain is just like training a muscle in your body – it quickly gets used to the single exercise that you repeat and soon you’re no longer making progress. When you try a different approach, it allows your brain to process information in a different way and you learn more. Besides – diversity makes your sculpting, drawing, and modeling exercises more fun.
This might not seem like such a big deal (and it is certainly not the most important thing for an artist to master) but knowing the language of anatomy and the technical art terms helps you a lot. When we become fluent in the language of anatomy, we also learn to think fluently about anatomy and creating. And you can find the right reference a lot faster.
Always evaluate what you’ve accomplished and share your artwork with friends, your teacher, or post it online. Your peers might make it easier for you to notice if something’s gone wrong. It is sometimes hard not to be defensive about your work, but remember that constructive criticism is helpful and benefits you.
When you’ve got the advice, follow through with it and make the corrections. As already mentioned – it is not enough to know what went wrong and just talk about it. You’re learning with your hands, through the process of creating.
Be the first to get news about our upcoming discounts, books, tools, articles and more! No spam, just the good stuff.

This tool provides a simple and fast way to know the proportions of an ideal and realistic human figure. It proposes an easy way for an artist to understand what the human body proportion sizes are.

This is a story of a static figure becoming a powerful demonstration of the link between muscle and motion.